
Help your fellow builder by leaving your feedback based on these three criteria:
- Originality: How original is this - never seen before?
- Building Techniques: How much skill do you think the creator of this MOC has, in terms of building technique?
- Details: Express how much you like the details of the build.
Your feedback is only shown to the creator as well as yourself. It is not available for other users to see. The creator won't see your user name.
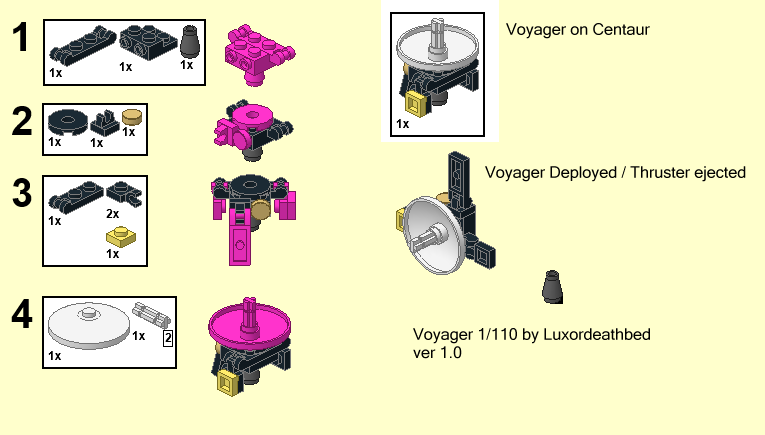
Mini probes may not be so mini no more
The advertised 1/110 scale of the probes I am making isn't so 1/110. I forget who is making a true 1/110 cassini-huygens, but I thank them for straightening that thought process out. I was to start calling them mini probes, but a simple plate reduction in the centaur stage resulted in redoing some of the probes. I attempted to put the spin launch thrusters on helios and in order to do so had to eliminate one plate on the centaur. I managed to jam pack helios in. But that lead to another attempt to right voyager to what its true shape should be. There is something to be said what you can do with your hands than with your mouse. The magnometer is now more to what I would like it length wise and rotated to the right area. The power source boom is longer and thicker. Instruments are unchanged except their position I think I righted. New instructions will be released. Here is a link to something fun that helps with this stuff. On a side note. Cassini-Huygens will under go a redesign too with this new found room and redesign.
https://voyager.jpl.nasa.gov/mission/spacecraft/interactive.php
Launch Pad 41 prototyped
All parts rolled in and now the tower and gantry are complete. There are some flaws that I need to correct but otherwise I am happy with it. I was able to make the service platform extensions stay in the actual model so that they don't fall out. 1st pic is everything ready for launch. 2nd is demonstration of service platforms extended. 3rd is with everything together with platforms extended. Now I want to redesign the trains a little to put more detail into them as I came across a pic with them and the Titan IVB in great detail.


Clash of the Titans Part 2
More mock up and adjustments. I hope some people here that haven't seen behind the curtain realise what it really takes to get some of these projects off the ground. I can only imagine what it took the team to do the Apollo Saturn rocket.
So the Titan IVB pretty much complete color wise and block wise. Also need to draw up the interior and make sure it is structurally sound. I had to take a different approach on the SRBUs due to them being bigger. I lucked out on how the IIIE is constructed and taking a word of warning.. used macaroni pieces instead of 4x4 round block as can be seen.
Regarding the Atlas V 551. I got a skeleton worked out like the SRBUs. I had to scale it down a little from my initial mock up as it started to look ridiculous. And it still looks odd. The actual height suffers at this point, but I think it is a sarifice to be made for structure and looks. Still not done with this one as the Titan IVB has a certain priority.
One last thing. I am waiting for some last minute parts to come in on the IIIE. When they arrive and work out on some tweaks on the IIIE, I will see on getting some instructions. Wanted to do it after 100 supports, but I am riding the rails on that line. Stay tuned.

Clash of the Titans
Well the Titan IVB is in the pipeline with some touch and go on the Atlas V 551. I figured out scaling and put up some faux rockets for comparison. The black/white scalers represent 10 studs each for each color with the horizontal blacks color/size coded for SRBs, 1st stage, shroud, etc. I could compare the IIIE to the IVB. I also threw in the first guess work on the Atlas V 551. It is going to present some different building techniques due to 5 SRBs being used. 3 on one side and 2 on another. Also the funky shape on top of them doesn't translate well into lego.
In a nutshell. Compared to the Titan IIIE, these are hUgE.

Viking probe/lander instructions v1.0
Third attempt at instructions and well under way. Probably my more complex probe so far. I tried to convey how it works in the instructions, but will reinterate here.
The actual lander and probe was launched "upside down". From there the blue solar panels would swing out when it broke away from the centaur stage. Unlike helios/voyager, I believe viking had its thrusters internal. At mars the lander would be dropped and after entry, the dishes (heat shields) would be discarded. Rotate the landing pads downward, pull out the radar dish on the side/stick it on top, and rotate the soil gathering arm downwards at an angle.
My only complaint about this model was I was not able to get the lander fully enveloped, but the way lego works is just that. Limited.


Helios Instructions 1.0
Second attempt at instuctions and we go off with helios. Only problem with this one is that it is a little to tall than the actual probe. I had to use many pictures to generate what I thought was the final deployed probe. There wasn't much to go on. Other than that, it is pretty close to the original.


Voyager Instructions v1.0
Here is my first attempt at making instructions. This version isn't 100% correct due to problems with positioning the magnometer (long 2x1 piece) on a small model. The instruments and camera are the yellow piece while the radioisotope electric generator (REC) is on the opposite end. The magnometer is suppose to be above the REC, but I haven't settled how to accomplish this. The golden record is included with the model. EDIT: Added numbers to parts

Titan IVB / Altas V
The bug to design a Titan IVB has taken over and plans are in place to start on it soon. I looked into more Centaur stage rockets and found that the new horizens probe used a centaur on top of a Atlas V rocket. I know that launch pad 41 was demolished and 4 lightning towers were kept to pave the way for the Atlas series but never delved much beyond that. Seeing an atlas V on what I believe is the gantry that the Titan IIIs used is taking me into the direction of adding an atlas V to this project. Already got measurements, but want more research to go into this before plunging. If anything, I might restart this project as Launch Pad something or another since it seems to be growing.
On another note, there were plans to use the centaur stage on an apollo rcoket before apollo was cancelled. I am not one to build or add to the collection of things that never flew, but it is intrigueing to see what could have been. I am waiting to open a saturn around Xmas. I might bite down on this project in the future. I believe they were planning on using a saturn IB booster with this one.
Centaur 1-DT / Cassini Huygens Probe / Shroud
A few details on the Centaur D-1T booster. I had to shrink the actual booster in order to fit it in the clamshells that currently exist in lego. So it isn't true scale as we would all like. Also the bottom of the booster should be rounded, but there are no inverted 4x4 rounded pieces so I had to improvise; and in doing so, managed to strengthen the nozzle connections I mentioned a bunch of updates ago. Another addition of accuracy was the ability to add a small part near the nozzles to represent the helium tanks.

A little off topic of the Titan IIIE. I went ahead and designed a Cassini Huygens probe that Fineas5297 asked about. I went ahead and kept the same area I used for all the Titan IIIE probes to see if I could cram it in there and it was possible. Here is a ldd pic of what I envision will hopefully be for the Titan IV. On another note, if the 1/110 shuttle gets ideaed, then I will look into doing a centaur / galileo probe for its cargo bay.

Finally a look into the shroud. I have it designed so that the 2 halves fall away easily once the cap is removed. This is accomplished via 2x1 plates and some tiles. It in fact creates a plate thick "hole" that allows a little more room to be squeaked out of the upper area for probes.

Prototype complete
Well, all the parts I wanted came in and the prototype is complete. I am encountering minor problems and one is where the center stage seems to be coming apart. Eiffleman had warned me about this and I think I see what is happening. Some of the lego pieces are not true in measure and leave some gaps. Since there are more connections in the SRBs, they are slightly longer and thus pull the center area apart is my theory. I probably am going to have to redesign a little and bring the upper connection points down and more in line with what Eiffleman did for his. Or another idea is to redesign the axels that support the center structure. More later down the line.

Help your fellow builder by leaving your feedback based on these three criteria:
- Originality: How original is this - never seen before?
- Building Techniques: How much skill do you think the creator of this MOC has, in terms of building technique?
- Details: Express how much you like the details of the build.
Your feedback is only shown to the creator as well as yourself. It is not available for other users to see. The creator won't see your user name.