
Building the Gantry - Notes and Parts List
Only a few things you need to be aware of if you decide to build the gantry.
It is important that the fixed sections of each platform are aligned centrally on the axles between the A-Frame connections . The Connections also need to be evenly spaced from either side of the fixed platform. It is recommended that the attachment points are checked against the pins on the A-frame and adjusted before being snapped into position.
Do the above settings for platforms the two middle platforms before they are joined together. Once joined this gives you a four point connection to the A-Frame which stabilises the frame and stops any sideways movement. By folding the frame down you can check your alignment as the rear of the fixed platforms goes into the channel on the base of the gantry.
The studs on the back row of the platform goes under the 'gliding groove' (Lego's description in LDD) on the 2x8 piece on the fixed part of the platform, slide the platforms all the way in - they will stop in at the mid point. Make up the end stops from the 1x2 roof tiles and 1x2 angular plates and attach them to the ends of the fixed platform's 1x12 plates (the sub-sub assemblies when you built the fixed platforms). On the middle section you need to guide the end stops over the technic connectors to the A-frame before they can be clicked into place.


Part 1 - The Base


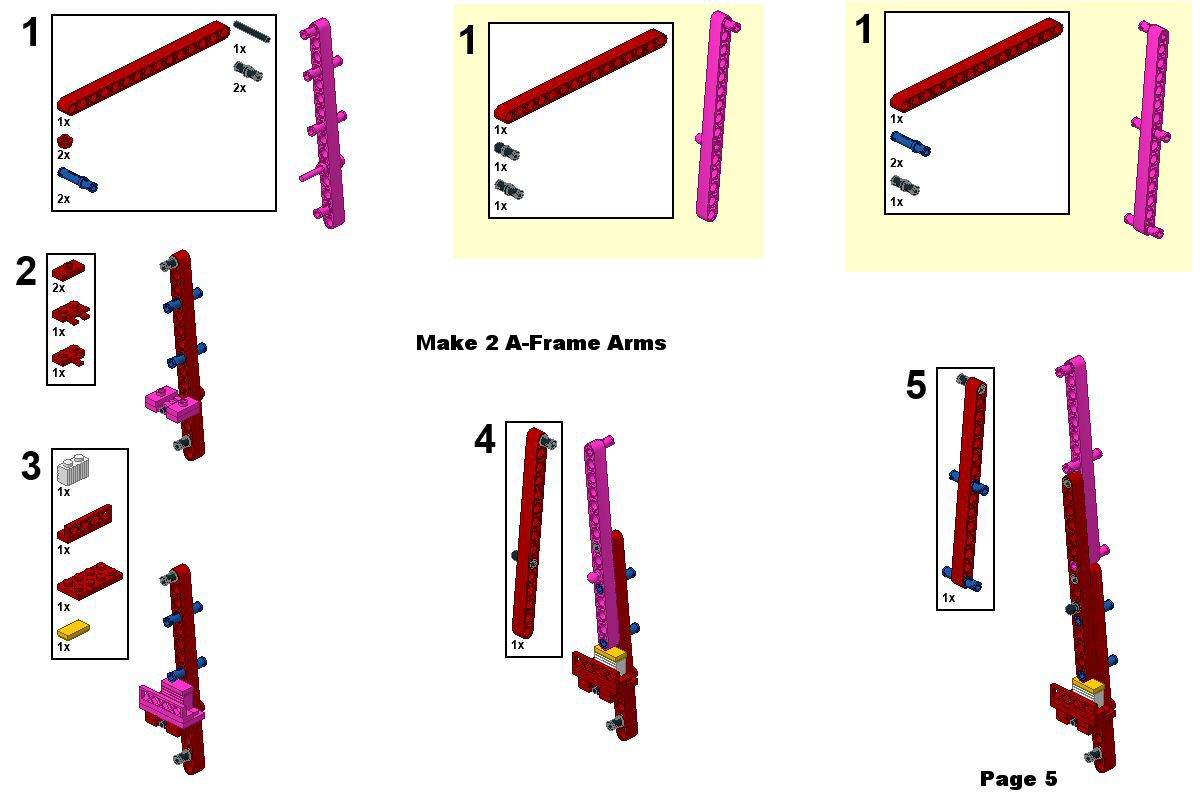
Part 2 - The A-Frame and Hammerhead Crane


Part 3 - Adding the fixed platforms


Part 4 - Adding the movable platforms


Rocket Wraps
Printed parts would be ideal but for now the only normal alternative would be stickers. These stickers would need to stick several pieces of lego together - not unheard of with official sets but why ruinyour pieces. I have found that printing on plain paper and using a strip of clear tape it is possible to wrap the paper tight enough that it stays in place on the model. Of course you could just print on sticker paper if you dont mind attaching it across the pieces.
The graphic below should be cut into three pieces - the humbug stripes and two pieces for 'United' and 'States'. Wrap it around the model tightly and tape the paper tube together.

The Launch Pad and Mercury-Redstone Rocket
Below are the build instructions for the launch pad and rocket. I have improved the appearance of the umbilical pivots and managed to set the booster umbilical to a fall slightly forward. This replicates the actual launch pad.
When I post build instructions I will always say if there are any issues with the build. With the umbilcals being quite long and not connecting to the rocket they do not always rest against the rocket in the correct position. I have found that by putting a slight twist in the pistols can help to align the umbilical vertically up the side of the rocket.
You have a choice with the astronaut figure - either use the printed astronaut figure or the plain silver trophy figure - the mercury astronauts wore silver suits with white helmets.


Watch out for High Winds
The Noble Company's Redstone service gantries had one extra freature that I had not been able to model in my original build. The gantry could be blown over, or damaged, in the high winds you can get at the Cape. The design was such that the gantry could be lowered to lay horizontally. I found a way of creating a connection to allow the model to do the same. An extra play feature, raising the gantry as you set up the launchpad; it may also help if you want to store the set away - it takes up less space when in the lowered position. Another plus is that it has created a stronger connection between the gantry and base.

Expired
Leave Private Feedback
This will only be visible to the creator.


