Distracted by another planet -- Saturn!
It has been awhile since I've done an update. One reason for the delay is I've been a little distracted ... building another planet. LEGO Ideas is doing a little contest, and I decided to try building a more challenging planet ... Saturn.
Here's a quick look:

There is also a little space probe approaching, too!
I thought it might be interesting to have alternate planets for the Planetarium itself (swap out Earth with other planets of your choosing), but the rings of Saturn make it a bit too big, I think.
Now, if you like it, please go cast a vote for it in the contest. Exploring Saturn
(Note that voting ends Feb 19, 2018. If you are reading this before then, hurry and vote! If reading after that date, well, go take a look anyway -- I posted an update there showing how to make this smaller planet ... a little different than the Earth globe in the Planetarium).
Finally, a reminder to share with your friends to help get this project to 10,000.
Thanks everyone for your support!
Saturn V is now at the Planetarium!
Today my Planetarium project received a great honor -- the Staff Pick! As a way of saying "Thank You", here is an update!
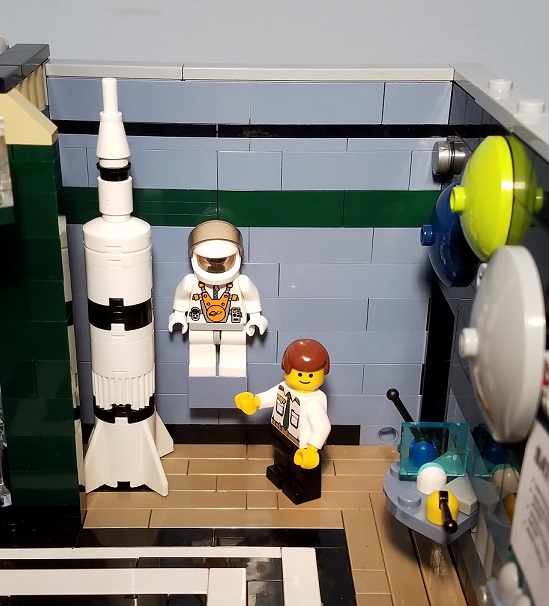
The rocket exhibit in the Planetarium just got an upgrade. Previously, the display merely featured a generic rocket build:

After seeing how successful LEGO was with the Saturn V set, I chose to use that as inspiration for a new rocket display. Now, it is a micro-scale rendition of a Saturn V! I hope you like it; the Planetarium tour guide sure does:

Yes, I know, the space suit needs to be changed to match as well. But I just didn't have something on hand ready for today's update. I'm sure when this becomes a kit, LEGO will provide an accurate version of the space suit. :-)
Thanks again for all of your support. And a huge THANKS to the staff for today's pick!
Eclipse at the Planetarium
The Planetarium doesn't get to enjoy the Total Solar Eclipse on Aug 21, so the staff and patrons are donning their eclipse glasses as they watch the partial eclipse! Of course, the secret agent guy gets fancy, designer eclipse glasses. :-)
The staff, along with the Planetarium's builder, want to remind everyone to enjoy the eclipse safely wherever you may be. Don't look directly at the sun without proper eye protection. (Only during the 2+ minutes of totality, if you are lucky to be along that path, is it safe to remove the glasses.)

Hanging the Flowers, and more...
Wow ... 1000+ supporters ... you guys are awesome. Thank you so much for your support!
Recently, one supporter mentioned in the comments that they wished they could vote more than once. Well, you can ... sort of. When you share this project with your friends on your favorite social media site(s), your one vote can turn into dozens with the help of your friends. And so on... and so on...
I must also give a BIG THANKS to a couple of sites -- BrickVault (a channel on YouTube) and Brickset.com -- who recently highlighted my project! The BrickVault video is really cool, as it takes my sequential pics of the rotating wall and shows them in a bit of animation. (this embed here is cued up to the right spot) https://youtu.be/ozo82KTOK7s?t=7m51s
Now, on to the business at hand, showing the builds for a couple parts of the Planetarium ... the Hanging Flowers, and the Turnstile. Every time I have shown the MOC to people in person, they frequently express amazement at these small features, so I thought it appropriate to show them in detail.
Some of the pictures are intentially over-saturated in hopes of making the black pieces easier to recognize.
The Hanging Flowers

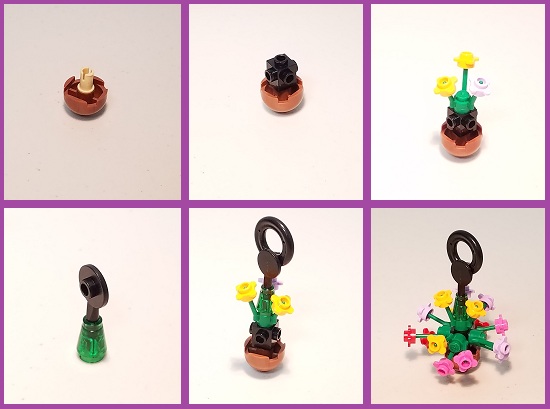
These are the parts to both the hanging plant itself, and the hanger used to hold it onto the building.

These steps should be clear enough, but I'll just mention when sliding the paddle down into the green cone, don't slide it all the way, just get it started. Wait until you've placed it onto the top flowers stud, then push it down until it stops against that stud. If you push it down until it stops against the table surface, you won't be able to place the cone onto the flowers stud. Perhaps I should have shown placing the empty cone first, but it was getting crowded visually in there, so I thought this a better way to show the build.
The hanger portion is simple, too. I'm showing it here away from the building for clarity.

Basically, the key is the 1x1 round plate with open stud (part 85861). This goes into the bottom of the hole in the modified 3x2 plate (part 3176) which sticks out from the building. The elephant tail/trunk (part 43892) is then able to attach to that open stud from the top, securing it solidly into place. Hang the plant onto the tail, and cap with the Technic Ball Joint (part 32474).
The Turnstile
Again showing this one apart from the building itself, and with assorted colors, for clarity.

Regarding the technic pin 1/2 (part 4274), I believe these all come without friction ridges, but if I'm mistaken, be sure your build doesn't have a pin with friction ridges, else the turnstile 'arms' won't be free to turn. The last frame shows a side view. Here I used a 2x2 tile onto the bracket side to help close the 3-stud-wide gap to a more appealing close fit for the turnstile.
That's it for today. Thanks again for all your support. Let's get this project to the next milestone!
Building the Earth Globe
Thanks again to everyone that has supported my Planetarium ... it is exciting to see the growing support every day!
I mentioned in the project that I'd post updates including how I built various parts. In this update, I'm going to describe how I designed the big Earth Globe on the first floor.
Very early in my thoughts for a planetarium, I knew it would have to feature a spinning globe of Earth. At first, I had envisioned using one of those planet-balls from the special Star Wars kits of a few years ago (I would've used Alderaan for its Earthlike similarities). But, I found that to be much bigger than I'd hoped.
I then stumbled across another project here on Ideas that gave me the inspiration. It had already expired, so I wasn't able to add my support. It was Jumpei's Mini Earth project, as seen here: https://ideas.lego.com/projects/17423 In it there is a video showing how to build that globe. It took a few viewings, but I eventually built myself my first LEGO ball.
But as I played around with my new prototype Earth Globe, I discovered there was a design fault ... sometimes putting on one of the last two quadrants would cause one of the modified 1x4 bricks (part 30414) to come loose on the inside. I quickly determined the cause. By removing two of the pieces that I decided weren't necessary, and changing the order of assembly, I can now assemble the globe solidly ... and you can too ... every time! I'll point out the solution below in the final assembly phase.
 First, before you say I just copied Jumpei's globe, take a look at my ... quadrants. (Not sure what to call one-sixth of a sphere... a sexosphere? ... I think I'll just use quadrant instead.) My continents are shifted a few studs around the globe. And I added Antarctica with a pin so it could spin. (Sorry for the blurry Antarctica. I didn't realize it was a bad picture until this evening as I was starting this update, and I don't have time to fix right now. I'll edit next week with a clearer pic.)


Here is how I built each one. Sorry for not completely disassembling every layer. This is my one and only working model, and I feared making a mistake trying to reassemble, so I left the first two layers intact. You can see the top of it above on the left side of each row, and the bottom/underside is pictured below:

With the six quadrants done, you are ready to assemble the globe.

First you will assemble the four quadrants that have the modified 1x4 bricks on them ... each side rotates the 'end tabs' from the adjacent side; the quadrants on the equator have those tabs pointing north/south and the poles are pointing ... well, I guess that's north/south too from those ends ... let's just say they are turned the other way (pointing towards the opening). It is important to assemble these four quadrants first, so you can reach inside to help press/secure everything together.
 And here we take a closer look at the change I made. I don't use the additional modified bricks here, so only two are positioned to hold each remaining quadrant. But look closely to see the stability solution -- those two bricks are slightly overlapping the bricks behind them that hold those quadrant pairs together. This means when you try to press the final quadrants into place, if you are slightly out of alignment, it WON'T pop those bricks off. Instead, they are held in place, so you can get aligned correctly and press the quadrants securely into place!
Earth Globe piece count: 179
There are a couple places where I could've used a 2x6 instead of two 2x3s, but I had run out of the bigger pieces. So actual piece count could be a couple lower, I'm sure.
I hope you enjoyed this close up look at my Earth Globe.
Please continue to support and share this project. When we get to 1000 supporters, I'll highlight another part of this project's build. Thanks!


