9000+ So Close to Reaching Orbit!
Wow! We've soared past 9,000 and need just over 700 supporters to get to the goal! Unbelievable! Thank you for all your support! It has been an incredible ride so far. We're almost there!
Process
Recently, I had a friend ask about my process and how I got started. It began with wanting to make small modifications to the newer Lego city shuttle (60080), but it took on a life of its own, and soon I was building a completely new model from scratch.
To make those changes, I started by drawing up plans on graph paper and planning in Lego Digital Designer (LDD), then applying the ideas to the physical model. I also worked the other way, making changes on the physical model and adjusting the LDD file to match. It was a lot of back and forth. My plan was to make it so 1 meter was 1 Lego unit/stud. Here’s an example of some early plans:

Then the Lego Saturn V came out. It was such an amazing set that I knew I had to rework my Shuttle to this new scale. To do that I would need to figure out the measurements of the real Space Shuttle and how that translated to this new scale. So I created a spreadsheet with real and scaled measurements:

Once I had that it was a matter of building to those measurements. Again I would go back and forth between the physical model and the digital model, each time making adjustments.
It’s not always smooth sailing though. There's a lot of troubleshooting and adjustments along the way. One example, and one of the biggest challenges, was making the External tank 9x9 studs. This isn’t a normal Lego size, so I had to get a little creative to keep all the edges lined up while keeping it strong and stable. As you can see, that meant building a crazy internal structure to hold it all together correctly (I’m sure it could be simplfied a lot!).

Using reference images and these detailed measurements, I tried hard to maintain accuracy overall, whether it was dimensions, shapes, angels, colors or visible features on the Space Shuttle. I hope that it shows! Deep down I feel like it will never be finished as there will always be something that needs improving or adjusting.
I hope this is helpful to anyone looking to start their own Lego project. It definitely takes some elbow grease, but mostly it takes a lot of planning! I also hope this is helpful to anyone on the fence who is thinking of supporting this. Hopefully you will! Thanks again and please continue to share!
Quick Update at 8600+
Thank you for your continued support! We're less than 1,400 supporters away from getting this to 10,000! That's crazy! Please let your friends and family know about this so we can get this project into orbit!
A quick update. I've been working on making the External Tank more accurate. You'll notice a large tan pipe on the External Tank. This pipe is the Liquid Oxygen Feedline, and brings liquid oxygen from the top of the tank to the bottom where it hooks up with the Orbiter. In my previous images that pipe incorrectly ends part way down the tank. I redesigned this pipe to go all the way to the bottom, and also redesigned the Orbiter attachment to make it more accurate (this still needs testing to see if it's stable).

Thanks again, I hope this helps, and please continute to share! We're getting close!
Soaring past 8000!
Thank you all again for your support and sharing it with family and friends! I'm so grateful for all the continued support. Let's keep it going all the way to 10,000!
For this update I wanted to share a little bit more about the Orbiter part of the Space Shuttle. You'll notice it looks a lot like an airplane, but it's actually a high-tech glider! That means that it has no engines for its descent through the atmosphere and landing. The engines you see on the back are only used for ascent, and only when connected to the large external tank. To control its descent, the orbiter uses control surfaces on its wings, body, and tail.
Elevons - The flaps on each wing are called elevons, and are used for pitch (nose up/down) and roll control:

Body Flap - The body flap under the main engine thermally protects the rear engine components on re-entry, and can be used for pitch control. (On this model it's three separate surfaces, but on the real Shuttle it's a single flap)

Split Rudder / Speed Brake - The Shuttle also uses a rudder on it's tail / vertical stabilizer to control the yaw (nose left/right). What's interesting about the rudder is that it's split. When the shuttle lands it uses this split tail rudder as a speed brake:

I hope this is informative and shows some of the features of the orbiter for anyone still considering whether to support! Please continue to share with friends and family! Let's get this to 10,000!
5000, 6000, 7000, and up!
Wow! Thank you all so much for your continued support and sharing with friends and family! I've continued to be blown away by the support you've all shown for the project. I was planning to show this update at the 5000 mark, but the support is going so fast that we're now almost 3/4 to the goal!
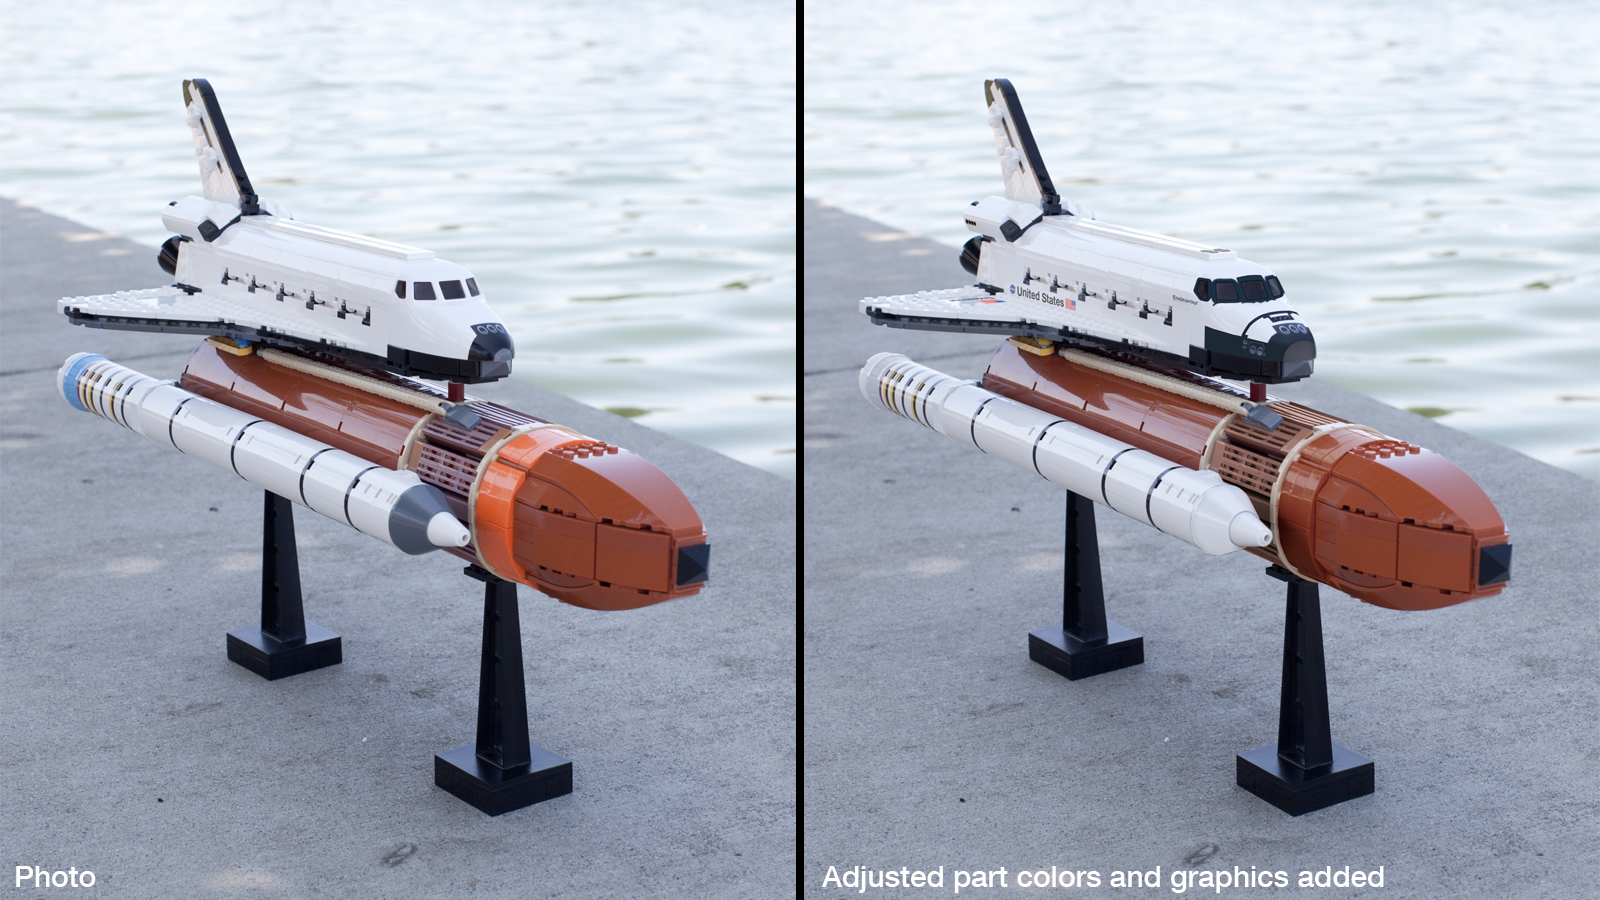
During this time I've been working on building a physical model to check how it might be built and if it would be strong enough for play. I recently went out and took some photos of it. You'll notice that some pieces don't exist in the colors I needed, so I've substituted them for other colors in the build. In some of the photos, I've digitally colored the parts and added graphics. You'll see the ones that are labeled. I've also added in photos of the launch pad and Astrovan, but obviously those are extras.
I find it's sometimes helpful to see a real model and not just computer renders, so I hope this helps for anyone deciding on whether to support the project!


Thanks again and please continue to share with friends and family! With continued strong support, it's possible that we could get this to the goal in time for the next review!
4000 Update!
Once again, the support is moving faster than I can update! Thank you all for your support in getting this to 4,000 supporters! I never imagined it would get this high. Please continue to share with family and friends to give this a shot at becoming a real set. For this update, I wanted to do a couple things, both historical and fun:
Launch Pad Display Stand
The first is to give the Shuttle a way to be displayed. This is a concept and I’m not sure if it would be a part of the final set or not. A lot of people have asked for a full launch pad and tower, but Lego Ideas caps the pieces at 3000 max. So I think this is a compromise:

Historical First Launch
The second thing is to have a little fun and show a little history. The first Space Shuttle launch, mission STS-1, took place 36 years ago on April 12, 1981. Just for fun, I wanted to see what this model would look like in the colors of the first launch:

Build-Your-Own Astrovan
The third thing I wanted to do is to give back a little something to all the supporters. When the astronauts would head to the launch pad, they would ride in an Airstream motorhome, nicknamed the “Astrovan”. Here’s the plan showing how to build it:

Thank you all again! Please remember to share with friends and family!
2500 and Upward!
What an incredible day! Your support has blown me away. I had planned a small update if we reached 1000, but we've gone well past that and are 1/4 the way towards our goal. Thank you all again. Please continue to share with friends and family to make this a reality.
For this update I wanted to show what the crew compartment might look like with the microfigures. Here is a full crew complement of 7 shuttle crew members: 4 on the flight deck and 3 on the mid deck (two in spacewalking suits). The flight deck has control panels and the mid deck has access to the cargo bay.

Also, even though this is presented as the Endeavour, there are some who would want to be able to change it to a different shuttle name. Of course there would have to be several other decals than I'm showing for accuracy, but this is just a quick idea of how you might change the name.

Hope these are helpful updates. Thank you again for your support!
500 and "Popular This Week"!
Your support has been overwhelming! We've now made it to the "Popular This Week" Page with over 500 supporters! Thank you!
In my description I mentioned that one of the reasons I want this set to become a reality is because in 2019 the California Science Center plans to display Space Shuttle Endeavour in its vertical full stack position, including External Tank and Solid Rocket Boosters, as if ready for liftoff. It will be impressive! Here’s a great article talking about the Solid Rocket Boosters and the Samuel Oschin Air and Space Center museum project:
https://spaceflightnow.com/2017/03/28/twin-solid-rockets-reused-veterans-of-spaceflight-going-on-display-with-endeavour/
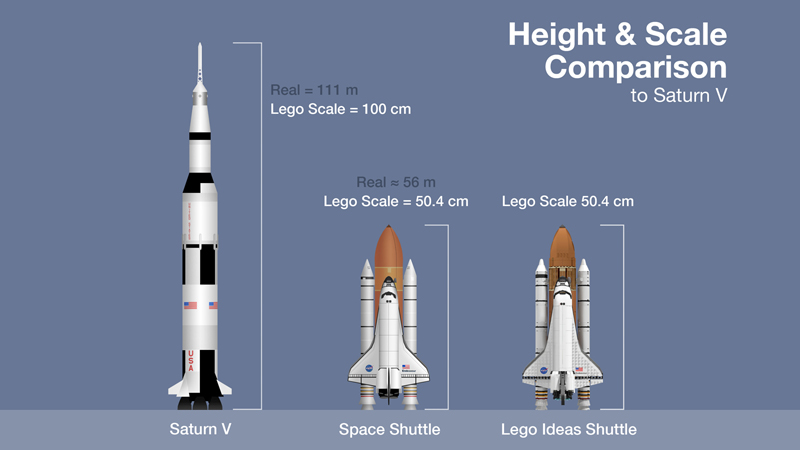
Also, I’ve been getting questions about the size of the set relative to the recent Lego Saturn V. I’ve added an image which shows the proportions relative to it.

Climbing past 300!
I didn't even have time to mark 200 by the time we reached 300! Thanks again for your support, everyone! Please let others know about this if you want it to become reality :)
We have liftoff!
Thank you to everyone for getting this to 100 supporters and giving it extra time to reach orbit!


